How to Build a Wall Mounted Desk: A Step-by-Step DIY Guide
My first wall mounted desk was a desperate measure. My apartment was small, and my floorstanding desk occupied half the room & I kept crashing into his legs every time I walked by.
A friend suggested going wall-mounted. I thought it sounded complicated. It wasn’t.
If you’re in a similar spot, cramped room, not enough workspace, or just tired of bulky furniture this guide is for you. No prior woodworking experience needed. Just a few tools, a Saturday afternoon, and the willingness to drill a couple of holes in your wall.
Why Wall Mounted Desks Are Worth the Effort
The thing no one tells you about wall mounted desks is that after having one, a floor standing desk just seems wasteful. You recover floor space you never even know you were losing.
The room breathes differently. And because you set the height yourself, it actually fits your body instead of some average measurement a furniture company decided on.
They are relatively inexpensive to create also. A good wood board, a pair of strong brackets, and a few hours’ time costs you 60% less than an equivalent store-bought desk.
What to Gather Before You Start
No need to overthink this. Here’s what you’ll need:
For the desk surface:
- Some solid wood plank stuff or MDF board at least 24″ deep so you’ve actually got room to work on it.
- Two different grits of sandpaper (120 for shaping, 220 for finishing)
- Some form of stain, paint or clear poly.
For mounting:
- Heavy-duty floating shelf brackets or L-brackets, check the weight rating before buying
- Screws and wall anchors suited to your wall type (drywall, stud, brick, each needs something different)
Tools:
- Stud finder
- Power drill and bits
- A good level, this one matters more than people think
- Measuring tape and pencil
- Safety glasses
Step 1 — Figure Out Where It’s Going
Grab the tape, spend five minutes figuring out its placement before even touching a drill. How wide do you need your desk to be? Any height that is comfortable for you sitting down? The general is about 28 to 30 inches above the floor, but if you are taller or shorter than ignore the guideline & select what feels right.
Gently mark the wall in pencil. Step back and look at it. Live with it for a moment. Moving pencil marks is free. Moving screwed-in brackets is annoying.
Step 2 — Find Your Studs (Don’t Skip This)
Wall mounted desks hold real weight. A laptop, a monitor, books, your elbows. It adds up fast. If your brackets aren’t anchored into something solid, you will eventually have a problem.
Run a stud finder across your marked area and note where each stud sits. They’re usually 16 inches apart. If your bracket positions don’t happen to land on studs, get anchors that are actually rated for load-bearing use — not the little plastic ones from the junk drawer.
Step 3 — Prep the Wood
If you did not order a pre-cut plank, cut it to the width you want. Then sand it — begin at the 120-grit to knock any bumps down, then hit the whole thing with 220-grit until everything feels truly silky smooth on your palm.
Use a damp cloth to wipe off the dust and allow it to dry fully. Then apply your finish. Two coats beat one every day, and patience between coats rewards. The biggest sin on a build like this is to rush the finish.
Step 4 — Mount the Brackets
Hold your first bracket up at the height you marked. Use your level to confirm it’s sitting straight — even a small tilt becomes noticeable once the desk is in. Mark the screw holes, drill your pilot holes, and drive the screws in.
If you’re going into a stud, it’ll feel tight and solid. If you’re using anchors, follow the instructions for that specific anchor type. Once all your brackets are up, lay your level across all of them together. Everything needs to be in line, not just individually straight.
Step 5 — Set the Desktop
Lay your finished board across the brackets. Most floating shelf brackets have a channel or lip on top where you can drive screws up from underneath into the wood — do this. It’s what keeps the desk from shifting or lifting.
Give it a firm press down once it’s secured. Test it from different angles. If it feels solid and doesn’t flex under pressure, you’re done.
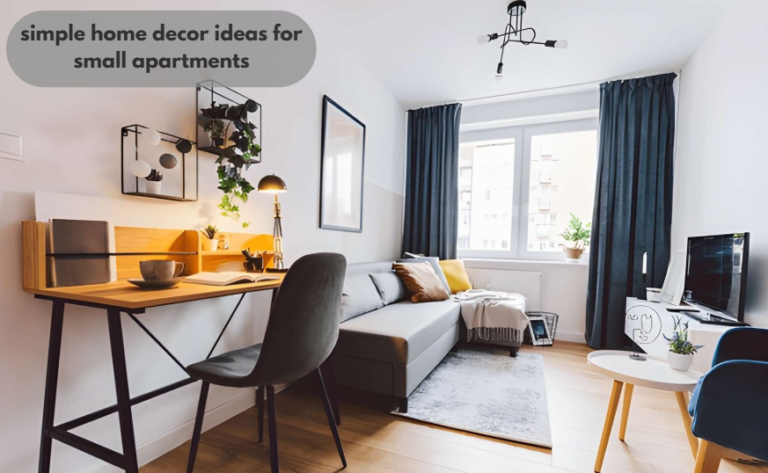
While You’re At It — Add Wall Mounted Shelves Too
When your desk is up, that wall space above it can become priceless. I got wall mounted shelves directly above your desk, one little choice that improves the vibe of the entire workspace.
A single shelf at eye level keeps the things you reach for most — a notebook, a glass of water, a small plant — off your actual work surface. A second shelf above that handles books, storage boxes, whatever needs a home.
You mount the wall mounted shelves in essentially the same manner that you did for the desk brackets — find the studs, carefully level everything, and don’t skimp on the hardware. Ensure to have at least 12–14 inch gap between shelves so it remains functional rather than a clutter.
If you want the entire piece to match with your desk, use the same wood & finish as that of your desk. This is a tiny detail, but it makes an actual impact.
A Few Things Worth Knowing
Check your bracket’s weight rating. This sounds basic, but a lot of people skip it. Know what your brackets can hold before you set anything heavy on the desk.
Brick and concrete walls need masonry anchors. Standard drywall anchors won’t cut it. Pick up sleeve anchors or masonry bolts if that’s what you’re working with.
Sort out your cables early. A cable tray mounted under the desk, or even adhesive cord clips along the wall, keeps things from looking like a mess the moment you plug anything in.
That’s Really It
For real, the most difficult part about making wall mounted desks is just doing that first hole. Then it all quickly falls into place. Get your measurements right, take the stud-finding step seriously, and keep a level nearby throughout.
Add a pair of wall mounted shelves above and you’ve built yourself a proper workspace — one that fits your room, fits your body, and costs you a fraction of what you’d pay in a furniture store.